You can create and use rule-based sales categories in a
sales catalog to help you create sales categories quickly and more efficiently.
Rule-based sales categories are a type of sales category that uses a
search-based, user-defined rule with WebSphere Commerce search to find and
automatically assign catalog entries to the category. By using rule-based sales
categories, such as for large categories or frequently changing categories, you
can reduce the time that is needed to assign or update the catalog entries for
the category.
Enabling rule-based sales categories
</_config:extendedconfiguration>
</_config:DeploymentConfiguration>
1. Create a rule-based sales category as follow:
To create a category in a sales catalog: On the explorer view, right-click a sales catalog or sales category. Click New Rule-Based Sales Category

2. Defining the rule for assigning catalog entries to a rule-based sales category : Now go to rule
tab, Following options are available
Expand the Search conditions for finding catalog entries to automatically assign to this category section. Specify one or more of the following search conditions for the rule to use to find and assign catalog entries to the category. These catalog entries are combined with any specific catalog entries that you assign to the category.
a. Catalog entry properties: You can use any of the following types of properties:
· Code
· Manufacturer Name
· Manufacturer Part Number
· Name
· Short Description
To use other catalog entry properties, an IT developer must customize the target to include the properties as search filters.
b. Categories
You can use master categories and sales categories. When you include a category, the category and all of its child categories are searched for catalog entries that match the search filter conditions.
c. Attribute dictionary attributes
If you want to use an attribute dictionary attribute, the attribute must be enabled for use in merchandising.
In below example we are using Attribute
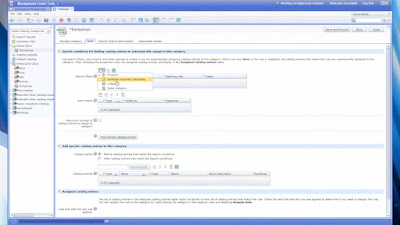

5. Under rule tabyou can create short criteria aswell.


Enabling rule-based sales categories
Procedure
1.
Go to the following directory and open your
custom wc-admin-component.xml catalog component configuration file for editing:
WCDE_installdir\xml\config\com.ibm.commerce.catalog-ext
Note: If the custom com.ibm.commerce.catalog-ext directory
and wc-admin-component.xml file does not exist for your site, you must create
the directory and file
2.
Go to the following directory and open the
default wc-admin-component.xml catalog features component configuration file:
WCDE_installdir\xml\config\com.ibm.commerce.catalog-fep
The wc-admin-component.xml file in this directory includes
configuration properties that you set to change the behavior of catalog-related
features. The RuleBasedCategoryConfiguration configuration grouping in this
file includes the configurable properties that are specific to rule-based sales
categories.
3.
Copy the following
RuleBasedCategoryConfiguration configuration grouping from the default wc-admin-component.xml
configuration file into the corresponding location in your custom
wc-admin-component.xml configuration file.
<_config:configgrouping
name="RuleBasedCategoryConfiguration">
<_config:property name="evaluationEnabled" value="false"/>
<_config:property name="evaluationEnabled" value="false"/>
<_config:property
name="evaluationHostname" value="" />
<_config:property
name="evaluationTimeInterval" value="-1" />
</_config:configgrouping>
4.
In your custom wc-admin-component.xml
configuration file, enable the evaluationEnabled configurable property by
setting the value for the property to "true". This property indicates
whether the rules for rule-based categories can be applied to the categories.
This setting applies for all rule-based sales categories in the system. When
the rule is applied to a category, WebSphere Commerce search uses the rule to
find catalog entries that match the search filters in the rule. The catalog
services then assign the catalog entries to the category. The resulting
relationships between the catalog entries and the category are stored in the CATGPENREL database table.
Note: You can reset the enablement configuration setting and
other rule-based sales category configuration settings by changing the values
for the properties and refreshing the RuleBasedCategoryConfiguration registry
in the WebSphere Commerce administration console.
If your custom wc-admin-component.xml file includes only the
RuleBasedCategoryConfiguration grouping, the contents of your file can look
like the following file:
<_config:DeploymentConfiguration xmlns:_config=http://www.ibm.com/xmlns/prod/commerce/foundation/config
xmlns:xsi="http://www.w3.org/2001/XMLSchema-instance" xsi:schemaLocation="http://www.ibm.com/xmlns/prod/commerce/foundation/config
../xsd/wc-admin-component.xsd">
<_config:extendedconfiguration>
<_config:extendedconfiguration>
<_config:configgrouping
name="RuleBasedCategoryConfiguration">
<_config:property name="evaluationEnabled"
value="true" />
<_config:property name="evaluationHostname"
value="" />
<_config:property
name="evaluationTimeInterval" value="-1" />
</_config:configgrouping></_config:extendedconfiguration>
</_config:DeploymentConfiguration>
Optional: Configure the properties that control the use of a
EvaluateRuleBasedCategories job for automatically reapplying rule-based sales
category rules. By configuring these properties, the rule evaluation and
application job can run automatically after a configured amount of time elapses
from the last time that the rule was evaluated.In your custom wc-admin-component.xml configuration file,
set a value for the evaluationHostname configurable property. This property
ensures that the EvaluateRuleBasedCategories job runs on only a single node.
Consider setting a value for this property to isolate the process for finding
and assigning catalog entries to rule-based sales categories from other
processes.
Set the value for this evaluationHostname property to be the
hostname for the server that you want the EvaluateRuleBasedCategories job to
run on.
Set a value for the evaluationTimeInterval configurable
property to be a positive value. This value is the time interval in seconds
that elapses before the job runs to reapply the rule for a category. The
default value for this property is "-1", which indicates that the
evaluation job is to never run.
When the time interval elapses, the
EvaluateRuleBasedCategories job runs to reapply the rule to a category. This
interval is measured independently for each rule-based category from the time
that the rule was last applied.
Save and close the file.
Now create rule based category from MC1. Create a rule-based sales category as follow:
To create a category in a sales catalog: On the explorer view, right-click a sales catalog or sales category. Click New Rule-Based Sales Category


2. Defining the rule for assigning catalog entries to a rule-based sales category : Now go to rule
tab, Following options are available
Expand the Search conditions for finding catalog entries to automatically assign to this category section. Specify one or more of the following search conditions for the rule to use to find and assign catalog entries to the category. These catalog entries are combined with any specific catalog entries that you assign to the category.
a. Catalog entry properties: You can use any of the following types of properties:
· Code
· Manufacturer Name
· Manufacturer Part Number
· Name
· Short Description
To use other catalog entry properties, an IT developer must customize the target to include the properties as search filters.
b. Categories
You can use master categories and sales categories. When you include a category, the category and all of its child categories are searched for catalog entries that match the search filter conditions.
c. Attribute dictionary attributes
If you want to use an attribute dictionary attribute, the attribute must be enabled for use in merchandising.
In below example we are using Attribute


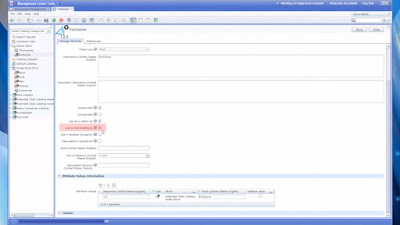
3. Make Sure “Use in the merchandising is checked for using this feature
4.Under
reference section you can see all product having particular attribute.

5. Under rule tabyou can create short criteria aswell.

