Thursday, April 30, 2015

Messaging system: The composer encountered the following error: Command not found

Problem : 00000046 CommerceSrvr  E com.ibm.commerce.messaging.outboundservice.Messaging compose(String,CommandContext,TypedProperty) CMN8423E: Messaging system. The composer encountered the following error: Command not found: "XYZView"..
[4/30/15 8:23:34:580 BST] 00000046 CommerceSrvr  E com.ibm.commerce.messaging.commands.SendMsgCmdImpl performExecute CMN0208E: Command "com.ibm.commerce.messaging.commands.SendMsgCmdImpl" failed to process. Error: Messaging system. The composer encountered the following error: Command not found: "XYZView"..
Correlation Identity: -1093f7ee:14d08b60dec:-78ce
Additional Data:
        null
Current exception:
Message:
   _ERR_EXEC_COMPOSE
Stack trace:
com.ibm.commerce.exception.ECSystemException: Messaging system. The composer encountered the following error: Command not found: "XYZView"..XYZView
        at com.ibm.commerce.messaging.util.ExceptionThrowingHelper.throwException(ExceptionThrowingHelper.java:125)

Solution : 
Solution is bit weired but it worked for me : The new message type created in Websphere admin console need to recreate. That mean just change device format to some thing else and finish. Again change back device format to required one. Hope it work :)


Device format should be standard device format (Or) as per ur requirment. Also check whether you have a store specific XYZView defined in struts-config.xml or struts-config-ext.xml.

Websphere MQ related data in IBM WCS DB

INSERT INTO profile (PROFILE_ID,STORE_ID,DEVICEFMT_ID,TRANSPORT_ID,MSGTYPE_ID,USERSVIEW,LOWPRIORITY,HIGHPRIORITY,ARCHIVEMSG,OPTCOUNTER) VALUES (36711,0,-4,3,3043,'N',0,0,0,28774);
INSERT INTO CSEDITATT (CSEDITATT_ID,TRANSPORT_ID,STORE_ID,PROFILE_ID,INSTANCE_NUM,CUSTOMIZABLE,CONNSPECATTNAME,CONNSPECATTVALUE,OPTCOUNTER) VALUES (41137,3,null,36711,-1,1,'factory','JMSQueueConnectionFactory',18769);
INSERT INTO CSEDITATT (CSEDITATT_ID,TRANSPORT_ID,STORE_ID,PROFILE_ID,INSTANCE_NUM,CUSTOMIZABLE,CONNSPECATTNAME,CONNSPECATTVALUE,OPTCOUNTER) VALUES (41138,3,null,36711,-1,1,'inQueue','JMSInboundQueue',4835);
INSERT INTO CSEDITATT (CSEDITATT_ID,TRANSPORT_ID,STORE_ID,PROFILE_ID,INSTANCE_NUM,CUSTOMIZABLE,CONNSPECATTNAME,CONNSPECATTVALUE,OPTCOUNTER) VALUES (41139,3,null,36711,-1,1,'errorQueue','JMSErrorQueue',16837);
INSERT INTO CSEDITATT (CSEDITATT_ID,TRANSPORT_ID,STORE_ID,PROFILE_ID,INSTANCE_NUM,CUSTOMIZABLE,CONNSPECATTNAME,CONNSPECATTVALUE,OPTCOUNTER) VALUES (41140,3,null,36711,-1,1,'outQueue','JMSOutboundQueue',22071);
INSERT INTO ISEDITATT (ISEDITATT_ID,PROFILE_ID,CUSTOMIZABLE,INTERSPECATTNAME,INTERSPECATTVALUE,OPTCOUNTER) VALUES (51467,36711,1,'JMSExpiration','0',15030);
INSERT INTO ISEDITATT (ISEDITATT_ID,PROFILE_ID,CUSTOMIZABLE,INTERSPECATTNAME,INTERSPECATTVALUE,OPTCOUNTER) VALUES (51468,36711,1,'mode','0',29682);

INSERT INTO ISEDITATT (ISEDITATT_ID,PROFILE_ID,CUSTOMIZABLE,INTERSPECATTNAME,INTERSPECATTVALUE,OPTCOUNTER) VALUES (51469,36711,1,'timeOut','60',15649);

Wednesday, April 29, 2015

ACP load in remote db

Steps to run ACP Load:

1. Keep PaymentsRetryCmdACPolicy.xml <Policy XML file) in D:\IBM\WCDE_ENT70\xml\policies\xml

2. Execute below command

acpload <IP Address>:50000/<DB Name>  <DB User> <DB Password> PaymentsRetryCmdACPolicy.xml <Schema>

3. Check if you have got two new files PaymentsRetryACPolicy_idres.xml & PaymentsRetryCmdACPolicy_xmltrans.xml 

IBM Websphere MQ view full Messages/XML

IBM Websphere MQ view full Messages/XML :

To get full length message : Go to Windows-->Prefrences

Prefrences window will appear --> Select messages
In Messages change Max data bytes to required one.
 To View message/XML in queue :

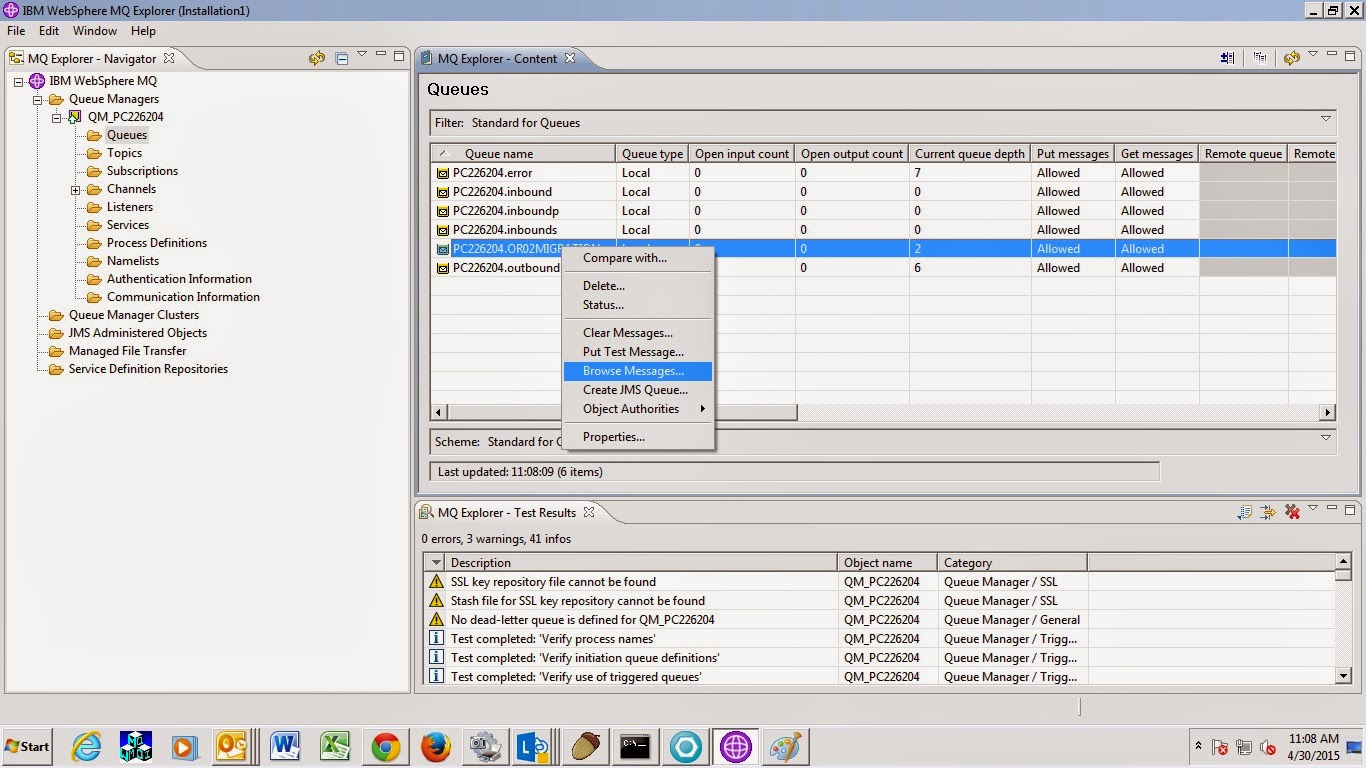
In MQ explorer --> Select required queue
Right click on queue and selct browse message
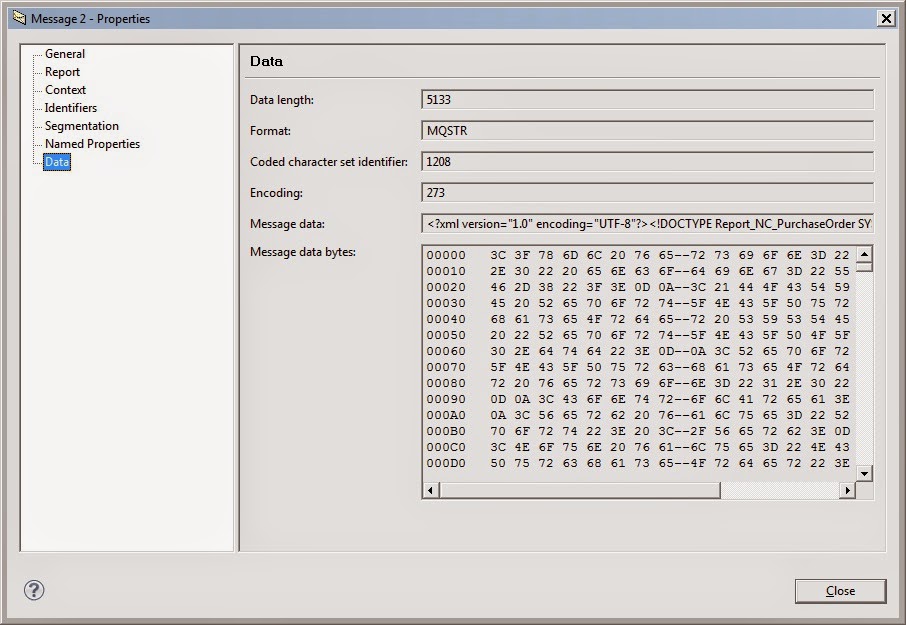
 In Message browser window  --> Double click on data
Select data tab : And get message data


Monday, April 20, 2015

Order Status Transition flow diagram in IBM WCS

Order Status Transition flow diagram


The Order status transition flow diagrams section provides order process flow diagrams for different store configurations and shopping flows. The Order status transition flow diagram page provides and overall view of the Commerce order states; it also lists the commands which govern the transitions between those states:


Transition from state B to M
Managed by the ProcessBackordersCmd command, which should be scheduled on the store level.

Transition from state M to C to R
Transition from state M to state C is conditioned by the payment status, which has to be authorized: EDPPAYHIST table must contain ApproveAndDeposit (or Approve) value in the OPERATIONNAME column, and PPCPAYMENT must have APPROVEDAMOUNT set. The command which transitions the order from state M to C is the OrderPaymentSynchronizeCmd command, which must be scheduled on store level - see Scheduling the processing of pending payments page for more information: Scheduling the processing of pending payments
To facilitate development and avoid the need to schedule the OrderPaymentSynchronizeCmd command, the payment rule can be changed to Early Deposit; together with using the BillMeLater or PayLater payment methods we can configure the development environment for straightforward testing. To change the payment rule, modify the PaymentMappings XML file:
Location: WC_eardir/xml/config/payments/edp/groups/default
Change the paymentActionRule from “Early Approval” to “Early Deposit”:
<Mapping paymentActionRule="Early Deposit"
paymentConfiguration="BillMeLaterOffline" paymentMethod="BillMeLater"/>
<Mapping paymentActionRule="Early Deposit"
paymentConfiguration="BillMeLaterOffline" paymentMethod="PayLater"/>
Then restart the server. More about payment rules in the Information Center: Payment rules provided in WebSphere Commerce
The next step is to schedule the ReleaseToFullfilmentCmd command on the store level to transition the order from state C to R or, with the Early Deposit payment rule, from state M to R.

Transition from state R to S
This step requires a pick batch, a release package, and release shipment confirmation. I found it more convenient to use the Accelerator tool for testing:
Pick batch: Select a store and fulfillment center, then open Operations->Pick batches. All R state orders will be added to this pick batch.
Using the same store and fulfillment center, create a package for an order via Operations->Find releases ready to ship
Once a package was created, confirm the release as shipped using the “Find releases ready to ship” screen

Transition from state S to D
Managed by the OrderCloseCmd command, which must be scheduled on the store level (or on the site level with storeId=xyz parameter set). The order can be closed only if the payment for the order is deposited; the EDPPAYHIST table must contain ApproveAndDeposit (or Deposit) value in the OPERATIONNAME column, and PPCPAYMENT must have DEPOSITEDAMAOUNT set. This state can be easily achieved by using the Early Deposit payment rule.

Tables which may come handy when dealing with the order process flow:


ORDERS, BUSEVENT, EDPPAYHIST, SCHCONFIG, SCHSTATUS, PPCPAYMENT, ORDERITEMS, ORDRELEASE, FFMCENTER, PICKBATCH, CMDREG, STOREENT


Refrence : an overview of moving an order through states

Tuesday, April 7, 2015

DB2 related collection

Create Table
create table TABNAME (ORDERS_ID BIGINT, BRAND  VARCHAR(10) , MIGRATIONRUN_ID  BIGINT, STARTTIME TIMESTAMP, MIGRATIONSTATUS CHAR(2),
constraint constraint f_orders foreign key (ORDERS_ID) references ORDERS (ORDERS_ID));

Creating Index on table
CREATE INDEX ITABNAME ON TABNAME (BRAND , MIGRATIONSTATUS);

Creating unique index:


db2 create unique index <index_name> on

<table_name>(<unique_column>) include (<column_names..>)

Dropping indexes

db2 drop unique index <index_name> on

<table_name>(<unique_column>) include (<column_names..>)

Getting indexes of perticular table :

db2 "select * from syscat.indexes where tabname   = 'your table name here' \

                                  and   tabschema = 'your schema name here'"

OR

SELECT INDNAME, DEFINER, TABSCHEMA, TABNAME,
COLNAMES, COLCOUNT, UNIQUERULE, INDEXTYPE
FROM SYSCAT.INDEXES
WHERE TABSCHEMA NOT LIKE 'SYS%' AND

TABNAME = 'TABLE_NAME'


create table TABNAME  (ORDERS_ID BIGINT NOT NULL, BRAND  VARCHAR(10) , MIGRATIONRUN_ID  BIGINT NOT NULL, STARTTIME TIMESTAMP, MIGRATIONSTATUS CHAR(2),
constraint p_xordmig  PRIMARY KEY (ORDERS_ID, MIGRATIONRUN_ID),constraint f_orders foreign key (ORDERS_ID) references ORDERS (ORDERS_ID));
Alter Table 

Change to make not null column
ALTER TABLE TABNAME  ALTER COLUMN <ORDERS_ID> SET NOT NULL;

ALTER TABLE TABNAME  ALTER COLUMN MIGRATIONRUN_ID SET NOT NULL;

Change to make primary key
ALTER TABLE XORDERSMIGRATION_OR02 ADD CONSTRAINT  p_xordmig  PRIMARY KEY (ORDERS_ID, MIGRATIONRUN_ID);

Dropping a table

DROP TABLE TABNAME


Duplicate entry in column

select count(*), CATENTRY_ID, ATTRIBUTE_NAME from XATTRNONECMC

group by CATENTRY_ID, ATTRIBUTE_NAME

Count column will give number of entry

Frequent JSTL use in IBM WCS

1.     Control statement :
 <if test="${!orderStatus. itemsReturned }">
                  </c:if>
2.      Setting Variables in a JSP:
 <c:set var="status" value="P"/>
 <c:set var="errorZipCounter" value="0" />
 <c:set var="accDisplaycount" value="${accDisplaycount + 1 }" />


3.  If, Else this is the equivalent of If Else as JSTL does not have the usual If Else
    <c:choose>    
 <c:when test="${!empty WCParam.source}">        
       <c:set var="source" value="${WCParam.source}" />        
  </c:when>     
 <c:otherwise>      
  <c:set var="source" value="${source}" />     
 </c:otherwise>    
  </c:choose>


4. For statement: counter is current status variable, you could get index\first\last\current\count status.
 <c:forEach items="${orderList}" var="order" varStatus="counter">
  If the orderList is a list of orderdatabeans or something, you could loop through them
 </c:forEach>
5. If statment example:
 <c:if test="${(!empty WCParam.orderStatus && (WCParam.orderStatus eq 'Y'))}">
  You can use eq,ne,lt,gt,ge,le other relational operators
 </c:if>
6.  Constructing hyperlinks: Prep-ends the name of current servlet context,URl encoding of request params and values, URl re-writing for session management.
 <a href="<c:url value='/content/sitemap.jsp'/>">View sitemap</a>

 <c:url var="productDisplayURL" value="ProductDisplay">
      <c:param name="catalogId" value="${WCParam.catalogId}"/>
      <c:param name="storeId" value="${WCParam.storeId}"/>
      <c:param name="langId" value="${WCParam.langId}"/>
      <c:param name="productId" value="${accessoryItem.itemId}"/>
 </c:url>
7.  Include content of a JSP into another JSP:
<c:import url="../../CurrentOrderSection/OrderItemDetailsDisplay.jsp">
  <c:param name="orderId" value="${WCParam.orderId}"/>
  </c:import>

  <% out.flush(); %>
  <c:import url="${storeDir}include/footer.jsp"/>
  <% out.flush(); %>

  <% out.flush(); %><c:import url="{storeDir}include/header.jsp"/><% out.flush(); %>
8. Removes a variable from scope:
                 <c:remove var="wishListURL" scope="page"/>
9. Print the value: Also helpful to print values in JavaScript. The <c:out> tag evaluates an expression and outputs the result on the page
 status:<c:out value="${WCParam.status}"/>
 firstName:<c:out value="${orderDetailsVB.orderBillingAddress.firstName}"
 <script language="javascript" src="<c:out value="${storeJavascriptDir}/browser_detect.js" />"></script>
10. Using functions: There are several functions that are very helpful
 var paramvalues = "<c:out value="${fn:substring(config.params, 1, -1)}" escapeXml="false"/>";
 <c:set var="dispalyPrice" value="${fn:substringAfter(orderItemTotalPrice,)}"/>
 <c:when test="${fn:indexOf(locale, 'en') >= 0}">
 </c:when>
11. useBean to instantiate and auto populate the bean

 <wcbase:useBean id="productVB" classname="com.abc.catalog.beans.ItemViewBean"  scope="request" >    
   <c:set target="${productVB}" property="itemId" value="${WCParam.catentryId}" />    

</wcbase:useBean>  

Monday, April 6, 2015

WebSphere Commerce Architecture

WebSphere Commerce Architecture

The following software components are associated with WebSphere Commerce:
1.    Web Server
2.    WebSphere Application Server
3.    WebSphere Commerce Developer.


WebSphere Commerce Application Layers

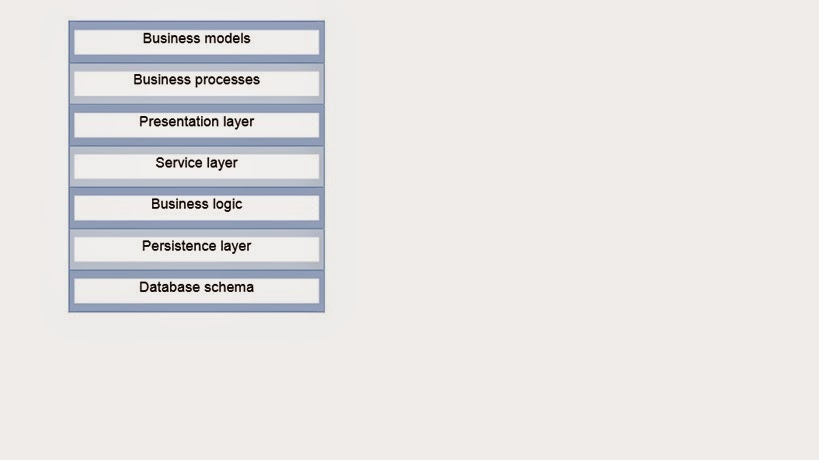
WebSphere Commerce Application architecture consists of 7 layers. Each of these layers has the different functionality


Database schema
It is the bottom layer which stores all data from the WebSphere Commerce Server. Examples of the tables that are stored in database can be Order Table,
Member Table, CatEntry Table.
Persistence layer
This layer registers the data and operations made using WebSphere system. The layer represents entities used to encapsulate the data-centric logic that is needed to take information from database. They act like an interface between the business components and the database.

Business logic
It contains the actual actions of the WebSphere Commerce Server. In this layer the business rules are implemented using the command pattern. There are two types of commands: controller commands and task commands. Implementation is made independently of the presentation layer.
Service layer
This Layer includes channel independent mechanism that allows accessing
WebSphereCommerce business logic. It shows the business logic to the outside world. It supports two transport mechanisms: local Java binding and Web services.

Presentation layer
The task of the layer is to display results. There are two types of presentation layer supported by IBM WebSphere Commerce. The first of it is Web presentation layer, the display is rendered using JSP files. The second type is rich client, for this type presentation is rendered using Eclipse views and editors implemented with SWT components.
Business processes
Business processes show the processes available in WebSphere Commerce.
They are divided, according to the business model, into three areas:
Administrative processes, starter stores, solutions.
Business models
Business models describe the situation in which WebSphere Commerce products can be used to reach the goals. There are five business models provided by WebSphere Commerce: B2B (Business to business) direct, Consumer direct, Demand chain, Hosting, Supply chain. The sample starter stores are created based on these business models, and can be developed for users’ own needs.

WebSphere Commerce presentation layer
The view layer of the Model-View-Controller (MVC) design pattern is implemented using the JSP. The view layer uses data beans to retrieve and format data from the database. It also decides if the request should be sent to a browser or streamed out as XML. JSP files separate data content from presentation.
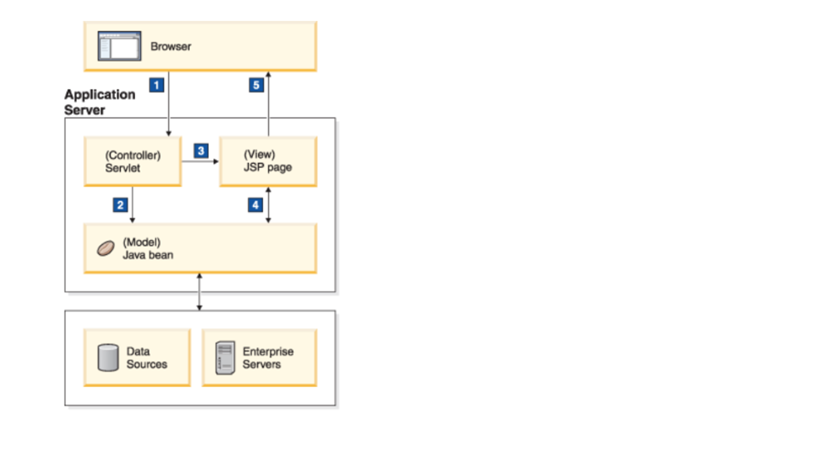
Below figure shows how the presentation layer works when the user uses
WebSphere Commerce store pages.
1. The user is browsing store pages
2. The servlet is getting the store data from servers using Java beans
3. JSP uses the data to display the information on the store pages
4. JSP interacts with store data via Java beans


Thursday, April 2, 2015

Installing the SQL Profiler on the server

Installing the SQL Profiler on IBM RAD

1.      Download RAD-SQL Profiler folder from the sample zip file.
2.      Copy the jdbcProfiler.jar into your D:\IBM\SDP\runtimes\base_v7\lib\ext directory
3.      Start your WebSphere Commerce Toolkit.


4.      In your WebSphere Commerce Toolkit workspace, make sure you are in the J2EE perspective.
6. For BD2 : Go to 'WC/META-INF/ibmconfig/cells/defaultCell/applications/defaultApp/deployments/defaultApp/resource.xml ' and change the implementationclassName of JDBC as below,      

IBM DB2 Type 4 JCC com.ibm.issw.jdbc.wrappers.WrappedDB2JCCDataSource

7. Unzip 'updatesite' and now go to RAD workspace,
go to Help --> Software Updates --> Available Software and click on 'Add Site' and select Local, now point to the updatesite folder which we unzipped. Now install it by selecting all default values. After this RAD will be restarted.

8. Now clean and publish the workspace, and restart the server, verify SQL profiler is working, Open SQL profiler repositories and click on the green play button to connect it, Now we can see all the SQL for the events ( like productDisplay page ) done on the server.

Refrence : SQL Profiler